Are You Sisters?


I am so excited that my daughter will be flying in from Colorado for a quick visit next weekend. We call them “hit and runs.” Two years ago we spent eight days at the Ritz Carlton in Jamaica, just the two of us. I thought it would be great to spend some one on one time away from both of our home fronts. Allowing for none of the everyday interruptions. It was a dream vacation with a good mix of exploration and relaxation.  

I started a scrapbook for her shortly after our return. It has sat by the wayside since I took my first card making class last April! I have been busy this past week plugging away on completing her scrapbook for her upcoming visit. I have always loved to scrapbook, but love that I can incorporate all my new card making techniques to the mix! The first night we sat down to dinner, the hostess that seated us asked us if we were sisters…

Jamaica Shenannigans  

Jamaica Shenannigans  

It happened a few times over the week and in this picture it truly does look like we are! So, this week my card making has taken a back seat for a good cause! Will be making the PPA sketch card to post before Monday. See you then!

Posted on October 19, 2013 .

PPA175 Color Challenge

Here is the color palette to be implemented in the PPA175 Challenge. Not your typical Christmas colors, but I thought I would see what I could do with it. To see the other cards submitted for this challenge click here.

ppa175.jpg

I used Cajun Craze card stock for the base, and ran a 5 1/4”x 4” piece of Always Artichoke card stock through an embossing folder with an evergreen and berry design for the next layer. I stamped the tree in Artichoke, the star in Simply Saffron and the planter in Cajun using the Pennant Parade stamp set. To create the Saffron frame, I cut the tree out with an oval framlelit and used the same size framelit inside a larger oval framelit. I used a paper hole punch to create the circles of Cajun, and placed the smallest pearls from the Basic Pearls inside them, for a bit of ta-da. I glued a pinch of dazzling diamonds on the star and added some glitter candy dots as the ornaments. To complete the card I stamped merry from the Pennant Parade stamp set in Real Red, cut with an 3/4" x 15/16" oval punch and popped up with dimensionals.


not your typical Christmas colors.... 

not your typical Christmas colors.... 

Posted on October 13, 2013 .

What happens in Atlanta - stays in Atlanta....well, some of it!

Atlanta "Regionals" Crew

Atlanta "Regionals" Crew

Weekend in Atlanta

Last weekend I flew into Atlanta, GA to meet and stamp with 20 other members of my extended Stampin’ Up! “family.” I did not know a soul before I left other than the interaction I have had with some of them on our Facebook page. By the time I headed home I felt like I had known them forever! I have not laughed so hard in I cannot remember how long! Not just laughed hard, but continuously! Was good for my soul.

We spent all day Saturday focusing on stamping techniques, card swapping, playing games and a CHOPPED CARD challenge. The challenge was we all had a bunch of “ingredients” we had to work with, but we all had to include a few of the same ingredients and had 30 minutes to complete the challenge. I cannot wait to share my own version of this challenge with my stamp club November 2nd.

my swap card design

my swap card design

secret ingredients for the Chopped Card Challenge

secret ingredients for the Chopped Card Challenge

I am sharing with you today the cards I made for the swap and the card I made for the challenge. For the swap cards (we each made 20 cards to swap with each other) I made 1 (one) style of card, but made 2 of each 10 card stock colors that I chose, so that I had a variety to share. The one pictured is made with Smokey Slate and Blushing Bride. For the challenge card we each had to use the Epic dsp, the punch, washi tape, indigo blue ribbon and the hello lovely stamp set. The brown paper bag with the prominent NO PEEKING label certainly got our attention.  Every minute of my trip was enjoyable. My two favorite memories would have to be Mary Fish using her butt to point in the Charades game (as you could not point with your fingers obviously) and dinner for 20 at the family style Italian restaurant. A great way to relax and wrap up a great day!

finished  card  - Chopped Card Challenge

finished  card  - Chopped Card Challenge

Posted on October 11, 2013 .

October Blog Hop

octbadge.jpg

Thank you for joining us for the Pals Halloween Blog Hop. We hope you enjoy our virtual trick-or-treat hop where you will either learn great tricks for your creative projects or take a chance to enjoy a blog candy treat. 

You should have just left stop number 9 on the Pals Hop - Mary Fish at Stampin Pretty. If so, you are in the right spot.  If you get off track, the full blog lineup below will help you move along from blog to blog so you see all of the amazing creations. 

Halloween is coming fast upon us. This month’s blog hop is sure to inspire you with some ideas for your own Halloween cards. I have eight and nine year old boys who were only too happy to cheer me on while I was creating this blog hop card! I drew the line when they suggested to draw blood dripping from the eye sockets. I was already nervous that it was too "outside the box" to share on my blog, but came to the conclusion – it is a Halloween card and it would be perfect for your favorite guy! This will be sent to my daughters’ favorite guy…hope you like it Scott!

Don't Cross Me... 

Don't Cross Me... 

I used the Gorgeous Grunge stamp set to create the look of blood splatter, using Real Red on Whisper White cut at 5 ¼” x 4” and adhered to a Basic Black base card. Using the Real Red marker vs. the ink pad and stamping off a few times after each stamp, gave the effect I was striving for. HERE IS MY TRICK - ONLY EMBOSS OR INK PART OF THE STAMP TO CREATE A TOTALLY NEW LOOK! Next, only a portion of a stamp from the Halloween Bash set was embossed to read HALLOWEEN. I also embossed only a portion of a stamp from the So Sorry set. The word that was eliminated from the stamp that reads “that bad things happen to good people.” That changes the meaning of the intended saying on the stamp dramatically.

cropped stamps examples

cropped stamps examples

A strip of the Witches’ Brew Designer Washi tape was placed across the card and topped with a black card stock circle, a red glimmer paper circle and the skull from the Witches’ Brew Designer paper cut into a circle. Basic Black candy dots on opposite corners and a white gel pen dot in the center of the eye sockets added the finishing touches to complete this card.

If my card gives you the heebie jeebies, then I have accomplished my mission! Leave me a comment if you dare...your feedback is my inspiration!!!

Information & Order Numbers:

 Stamp Set: So Sorry (Wood-mount 132585, Clear-mount 126527) Halloween Bash (Wood-mount 130577, Clear-mount 130580) Gorgeuous Grunge (Wood-mount 130514, Clear-mount 130517)

Paper: Basic Black (121045) Red Glimmer (121790) Witches’ Brew DSP (132185)

Ink: Real Red marker (100052)

Cool Tools: Big Shot (113439) Magnetic Platform (130658) Circles Collection (130911) Versamark (102283) Black Stampin’ Emboss Powder (109133) Heat Tool (129053) Embossing Buddy (103083)

Finishing Touches: uni-ball Signo Gel Pen (105021) Neutrals Candy Dots (130934) Witches’ Brew Designer Washi Tape (132156)

The next stop is Colleen Mollema at My Crafty Habit - stop number 11  on the Pals Blog Hop! Thanks for visiting – and I hope to see you next month!


Posted on October 8, 2013 .

HELLO HELLO

You've got my attention now!

You've got my attention now!

I have been very focused on card making these last few weeks. I am scheduled to host a table at an upcoming community event. The table will contain cards for sale that I have made and I will be demonstrating some of the tools and gadgets used in the making of the cards. My goal has been to have a good amount of inventory as well as variety. That translates into me pulling out all the stamps and getting busy. I purchased the Secret Garden Stamp and framelit bundle a few months ago and had yet to use it. It sure got used yesterday. I made a dozen of these cards in a variety of colors. The frame for the greeting was the 2nd smallest label frame from the Deco Labels framelits. The same size frame was used to cut the piece of cardstock for behind the greeting. The cardstock was then cut in half lengthwise and placed underneath the greeting. I popped up the greeting and the smallest flower with dimensionals. The pearls and rhinestines were added for the WOW factor. 

Information & Order Numbers:

Stamp Set(s) Mixed Bunch (Wood-mount 128442, Clear-mount125537) Secret Garden (Wood-mount 131940, Clear-mount 129144) Hello Hello single stamp

Paper: Primrose Petals (126841) Daffodil Delight (119683) Tempting Turquoise (102067) Real Red (102544) Pear Pizzazz (131201) Whisper White (100730)

Ink: Primrose Petals (126858) Bermuda Bay (131171) Chocolate Chip (126979) Old Olive marker (100079)

Cool Tools: Big Shot (113439) Magnetic Platform (130658) Secret Garden framelits (129372) Deco Label Collection framelits (130102) Embossing Folder (n/a)

Finishing Touch: Pearl Basic Jewels (119247) Rhinestone Basic Jewels (119246) Stampin Dimensionals (104430)


Posted on September 30, 2013 .

PPA173 Sketch Challenge

Here is the sketch... to see the other cards submitted for the challenge - click here.

PPA173 copy.jpg

Today’s card was made using basic black, pool party and very vanilla. I love the way the pool party accents the black and makes it pop, while on the other hand the very vanilla tones it down. It is a very striking and complimentary color combo. I knew immediately upon seeing the sketch that I would like the finished product no matter what color combo I used! I can envision so many other greetings and color combos using this layout. Hello There to my new favorite layout.                                                                                                                  

Here is my card... 


hello there.jpg

I also determined on the last sketch how much more enjoyable it was for me assembling the card using just the sketch. By not seeing any of the other cards before I bagan mine, not even the judges, it allowed me to not be influenced by a single thought. This card is made with just the sketch layout of the card as a tool. You would think that it would be harder to create without any inspiration, but for me it seems to be helpful. Who knew? Having only been involved in card making for such a short time, I can clearly remember sitting and staring at my blank piece of paper and thinking, “I’ve got nothing.” I spent a lot of time scrolling through websites looking at cards for inspiration. Not any more! Progress has been made!

Product Information + Order Numbers :

Paper: Basic Black (121045) Very Vanilla (101650) Pool Party (122924) Modern Medley DSP (126926)

Ink: Stazon Jet Black Ink (101406)

Stamp Set: Timeless Talk (Wood-mount 126605, Clear-mount 126607)

Cool Tools: Big Shot (113439) Magnetic Platform (130658) Squares Collection (130921)

Finishing Touch:  Subtle Candy Dots (130933) Pearl Basic Jewels (119247) Black Ribbon n/a


Posted on September 26, 2013 .

PPA172 Sketch Challenge

PPA 172 Sketch Challenge

PPA172.jpg

I received my goodie package in the mail today and could not wait to put to use my new Halloween washi tape. It just so happened that it came packaged as a set of three. The same exact number of stripes as needed for the challenge card! How perfect was that? I was amazed at how easy the washi tape was to work with. I made a card with just the washi tape, one with just the black twine and then this one with the twine atop of the washi tape. Bingo!

I have noticed that there are scary Halloween cards and cute Halloween cards. This is a good blend of both scary and cute. Kind of like me when I first wake up…lol.


To see the other cards in the PPA1 72 Sketch Challenge click here.

.

give me something good to eat

give me something good to eat


Posted on September 19, 2013 .

PPA 171 Color Challenge

PPA 171 Color Challenge

PPA171.jpg

I am such a fan of doing this weekly challenge. With a full time job and three elementary school age children it is tough to find a “me moment.” Knowing that I want to participate in the challenge forces me to think outside my box….which is family, work, chores, exercise and life’s challenges. I find the time to fit some joy in the schedule. Momentarily, a half dozen women will be arriving for a 10 card stamp-a-thon. I have diligently been prepping their cards all week. It is a good mix of Halloween, Christmas, Wedding, Birthday and Thinking of You cards. I needed a quick and easy card in order to participate in this challege! Click here to see the rest of the challenge. Anyone can participate and I highly recommend you do!


Cupcake for my cupcake

Cupcake for my cupcake

Posted on September 15, 2013 .

September Blog Hop

6a00e54f95df928834019aff464cc5970d.jpg

Thank you for joining us for the September Pals Blog Hop. This month we are showcasing projects made with the Stampin' Up! tools we love. 

You should have just left stop number 19 on the Pals Hop - Maggie Mata at Maggie Made Cards. If so, you are in the right spot.  If you get off track, the full blog lineup below will help you move along from blog to blog so you see all of the amazing creations.                 

                       A BAKER'S DOZEN TOOLS USED TO MAKE THIS CARD

The challenge was to showcase Stampin’ Up! tools for this month’s blog hop. The REAL challenge was which tools? Stampin’ Up! has so many cool tools to build, enhance and embellish a card. There were a few tools that I had a feeling other demonstrators would share with you today. That helped me to narrow down my choices to some tried and true fixtures from the catalog. I also stuck to my  tried and true favorites, which is anything bird related and all Thank You greeting cards. This was my first time using the Polka –Dot Pieces stamp set and the Bird Builder punch!.

a tweet thank you... 

a tweet thank you... 

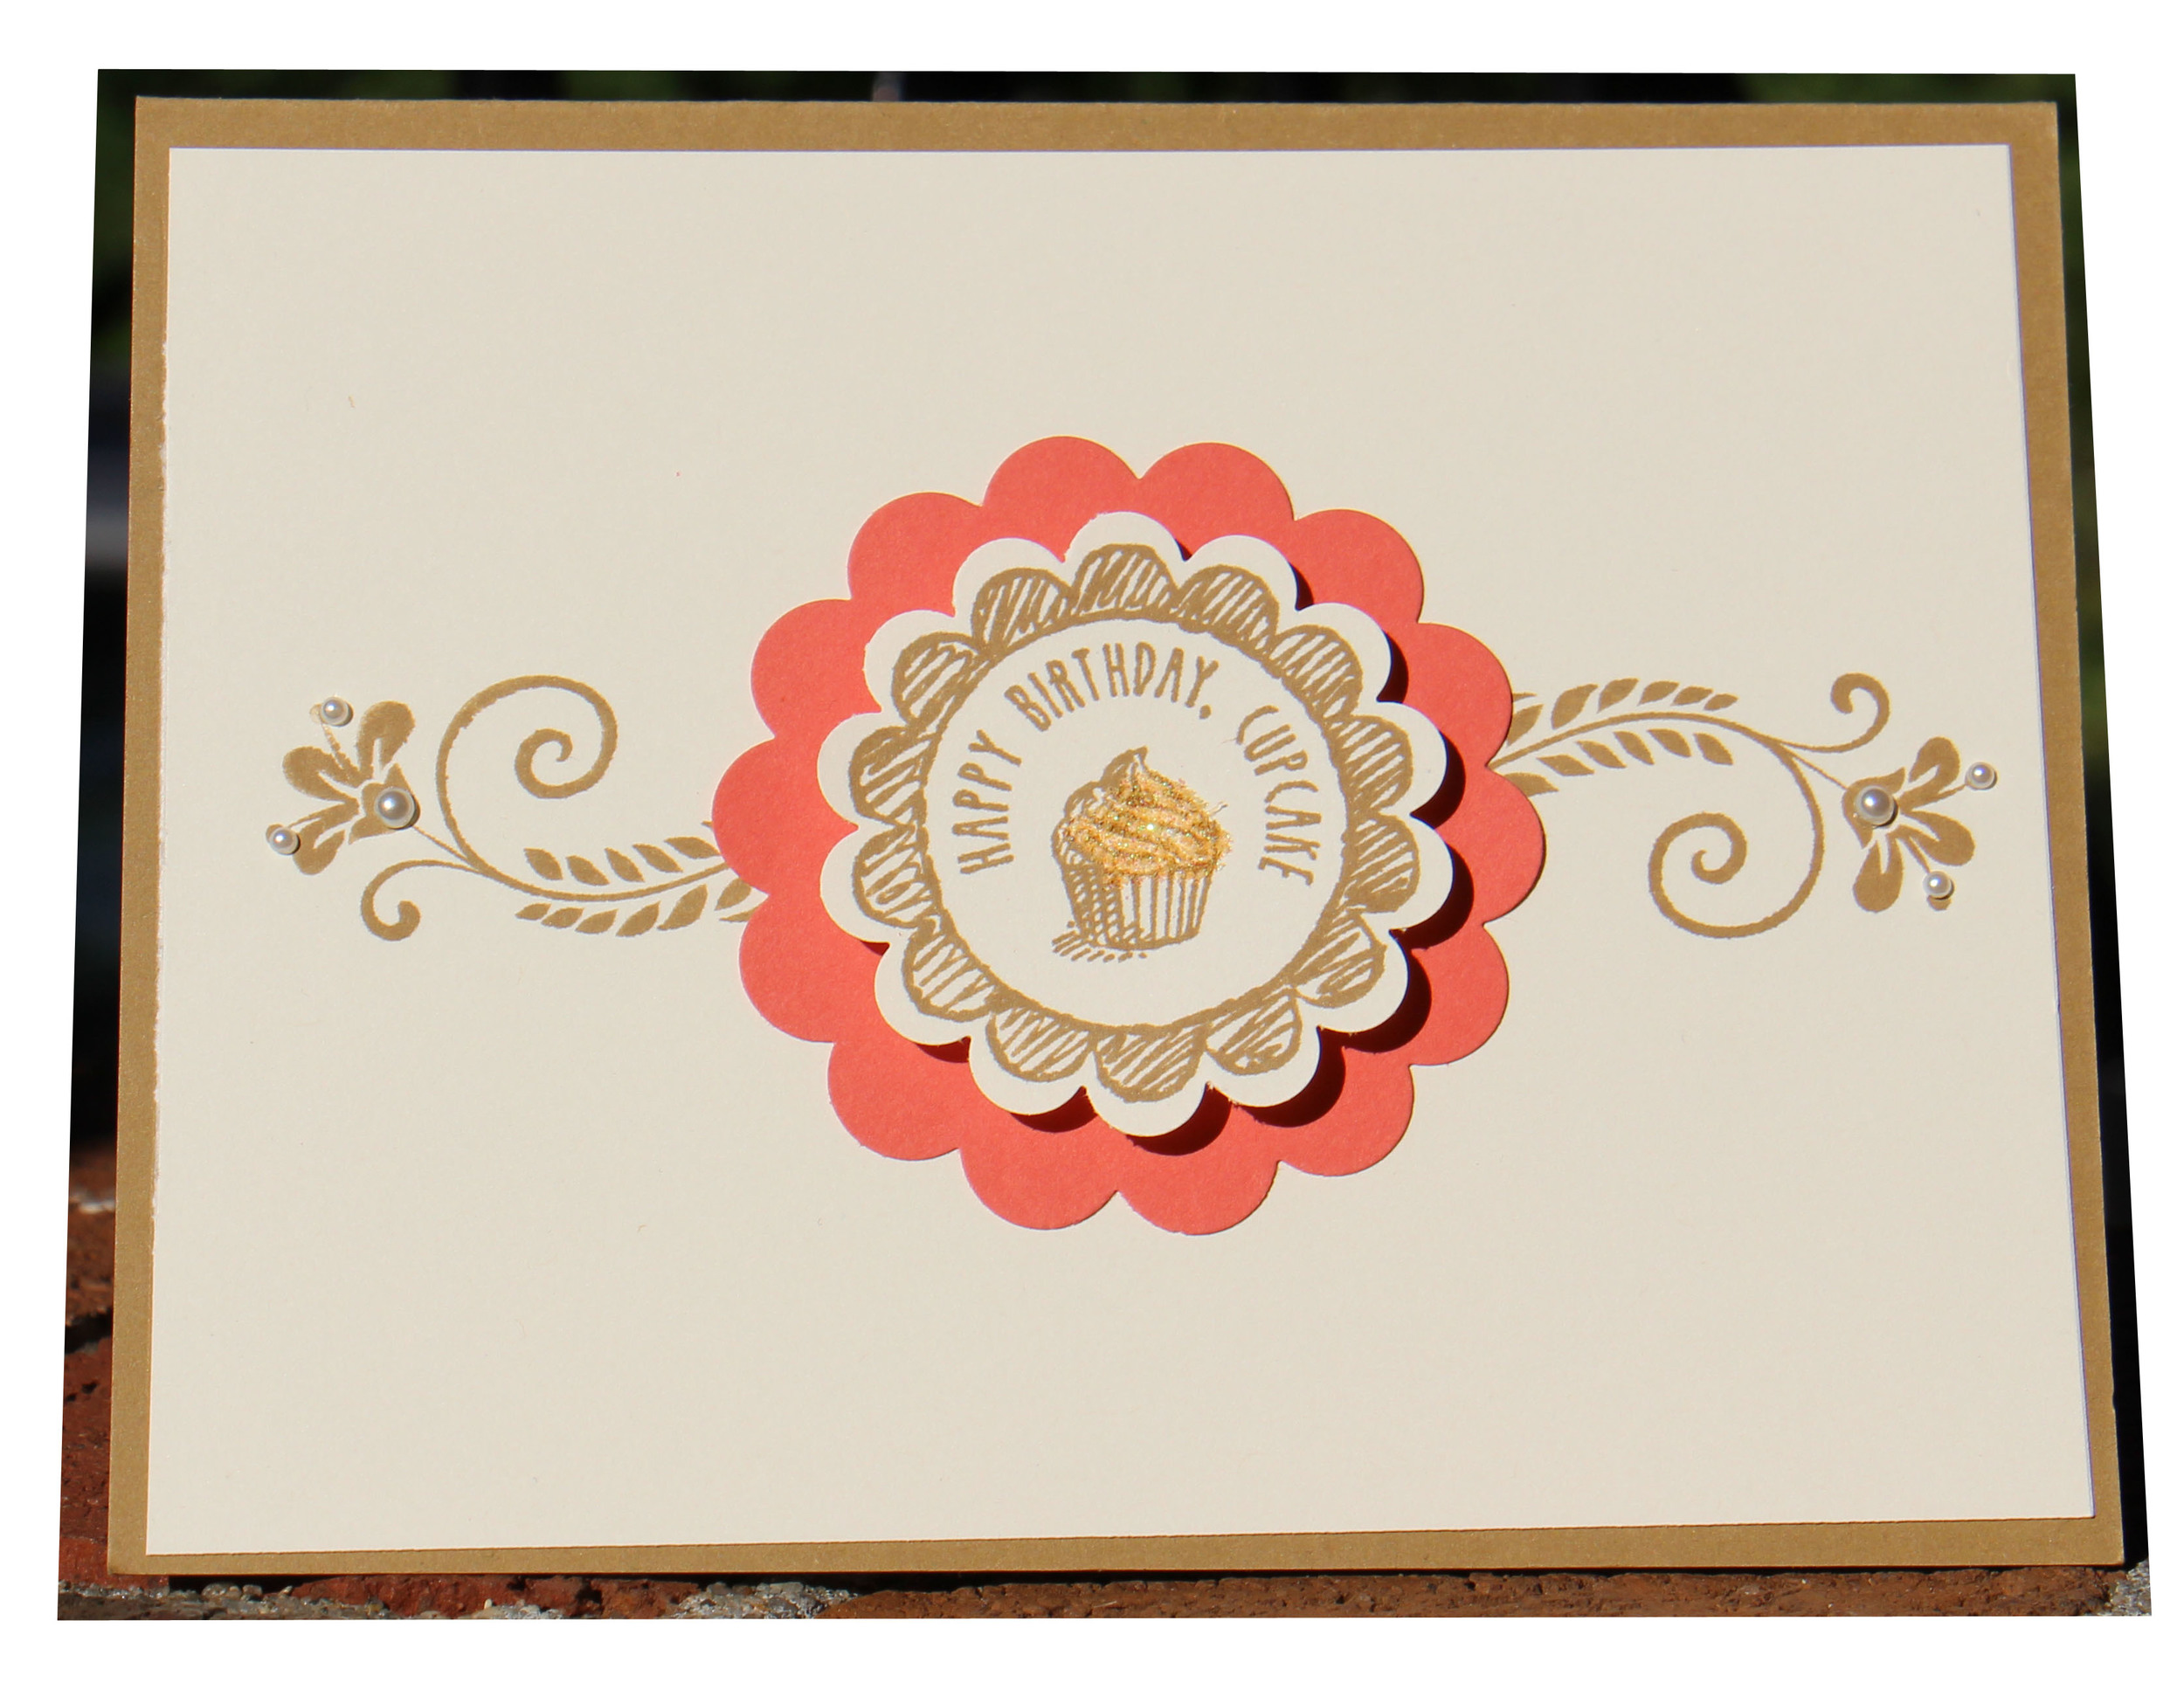
I initially used the piercing tool around the slate gray card stock but I felt it made the card feel "too busy" and detracted from the overall appearance. I am a HUGE fan of the look of piercing and really wanted to highlight this function, but this time the saying “More is Less” came to mind.  I also tried to emboss around the oval but could not get an even layer so I decided to emboss the Thank You greeting instead. I had originally stamped the Thank You greeting using two markers. Early Espresso, like the tree branch, for the greeting and Rich Razzleberry for the hearts below it. Plan B turned into embossing the greeting with Slate Gray embossing powder and using the Rich Razzleberry marker to highlight the embossed dots surrounding the greeting. My point is, even though I may start a card with something specific in mind, I sometimes have to reconsider, because it did not translate onto the paper quite as good (or as easily) as what I had envisioned.

I used the Trimmer (131375) to cut my Rich Razzleberry 8 ½” x 11” card stock in half for the card base. I used the Simply Scored Scoring Tool (126192 ) to place a fold crease, then used the bone folder (102300) to flatten the fold for a professional looking card base. I cut the Smoky slate for the next layer at 5 ¼” x 4” and then cut the final layer of Whisper White at 5” x 3 ¾”. I used the Big Shot die-cutting machine (113349) to emboss the Whisper White with the Fancy Fan Embossing Folder (127751). I also used the Ovals Collection framelits (129381) to cut an oval BEFORE I embossed the oval with the Designer Frames Embossing Folder (123130). I learned the hard way that if you run paper through the Big Shot after you have embossed it, any raised surface will get flattened. So cut first with framelits THEN use the embossing folder! I used my new favorite tool to hold the Oval framelit while cutting, the magnetic platform (130658). I used the Heat Tool (129052) to bring the Smoky Slate embossing powder to a nice glossy finish after rubbing the card with the Embossing Buddy (103083). The final step was using markers to color the bird and branch stamp and then punching the pieces out with the Bird Builder punch (117191). I then cleaned the stamp using the Stampin' Scrub (126200) with the Stampin' Mist Stamp Cleaner (102394).

THANK YOU for stopping by today and may you enjoy and be inspired by all the cards made by those participating in today’s blog! Please take a moment and let me know what you thought of my design today.      

Information & Order Numbers:

Stamp Set: Another Thank You Photopolymer Stamp Set (133454)

Ink: Rich Razzleberry marker (120970) Smokey Slate marker (131898) Garden Green marker (n/a) Early Espresso marker (119680) Versmark (102283)

Paper: Rich Razzleberry (115316) Smokey Slate (131202) Whisper White (100730)

Cool Tools: Trimmer (131375) Fancy Fan Embossing Folder (127751) Simply Scored Scoring Tool (126192) Bone Folder (102300) Big Shot die-cutting machine (113349) Fancy Fan Embossing Folder (127751) Ovals Collection framelits (129381) Designer Frames Embossing Folder (123130) Magnetic Platform (130658) Heat Tool (129052) Embossing Buddy (103083) Bird Builder Punch (117191) Stampin' Scrub (126200) Stampin' Mist Stamp Cleaner (102394)

Finishing Touch: Smokey Slate Embossing Powder  (129396)  Pearl Basic Jewels (119247) Stampin Dimensionals (104430)

The next stop is Nicole Watt at Pixel Maven's Retreat, stop number 21 on the Pals Blog Hop! Thanks for visiting – and I hope to see you next month!


Final Blog Hop Line Up List: 

  1.  Kim Czenszak at Live Love Stamp
  2. Shirley Sumption at Look at My Cute Stuff
  3. Barbara Chatzkel at Take Out Paper Arts
  4. Debbie Mageed at Secret Stamper
  5. Lynn Kolcun at Stamping with Avery's Owlery
  6. Debra Simonis at Deb's Stampin' Grounds
  7. Kerry Willard Bray at Stampgoodness
  8. Maria Flores at Maria's Sandbox
  9. Diane Roberts at Score at Four and a Quarter
  10. Dawn Tidd at Tiddbits From Dawn
  11. Amy L. Lazzell at Just A Thought...Cards by Amy
  12. Linda Callahan at Stampin' Seasons
  13. Mary Fish at Stampin' Pretty
  14. Peggy Noe at Prettypaprecards.com
  15. Beth Beard at My Litte Craft Blog
  16. Katy McGloin at Just Fun Stamping
  17. Sherrie Gross at Stampin' Sunshine
  18. Debbie Crowley at expressivelydeb...
  19. Maggie Mata at Maggie Made Cards
  20. Martie Pollard at The Crafty Bandit
  21. Nicole Watt at Pixel Mavn's Retreat
  22. Barb Furlong at The Love of Stamping
  23. Susan Itell at Simple Stampin'
  24. Rae Harper at Wild West Paper Arts
Posted on September 10, 2013 .

PPA170 Color Challenge

3 Cheers For You PPA170 Color Challenge

Midnight Muse – Crushed Curry and Early Espresso

CHEERS! 

CHEERS! 

Or get the colors as close as you can get to the suggested colors. That would be Night of Navy instead of Midnight Muse. What I love about the card making process is that there is no “wrong” way to make the card, even in the PPA color challenge! This time I did not peek at the cards already posted in the challenge before I put my card together. I think it helped me focus on creating versus trying to be as creative as the other cards. I tend to be intimidated by the artistic talent of others. I do not have many cards in my repertoire that have a masculine tone to them, but this will make one more…

To see the other cards submitted  - click here

Information + Order Numbers :


Stamp Set: Happy Hour (Wood –mount 132013, Clear-mount 126642)

Ink: Early Espresso  (129674) Early Espresso marker (119680) Night of Navy (126970) Night of Navy marker (100069) Crushed Curry (131173) Crushed Curry marker (131931)

Paper: Night of Navy (100867) Crushed Curry (131199) Early Espresso (119686) Very Vanilla (101650)

Cool Tools: Trimmer (126889) Sponge Daubers (102892)

Finishing Touch: Candy Dots Neutrals (130934) Candy Dots Regals (130932) ¼” Stitched Grossgrain Ribbon Night of Navy (126874) Stampin Dimensionals (104430)


Posted on September 6, 2013 .

Joy To The World

I have seen a few cards recently made using a map stamp and I just adore them all! Could it be because I love to travel? That might have something to do with it. The cards were all made using a map stamp yet they were all unique and different from each other. I am pleased with my finished card, as it is not like any card I have seen yet! I love the pop the embossing gives the greeting “Joy To The World.” The green and red candy dots give it just enough color to give it the Christmas feeling I was looking for, without overwhelming the map or greeting.  A more fitting greeting could not be found! The best part is that it literally took only 5 minutes to make!!! I plan on using it as one of the cards I will be making with my stamping club members this coming weekend. Back to the drawing board for the other cards we will be doing…

Let the holidays begin... 

Let the holidays begin... 

Product Information + Order Numbers : 

 Stamp Set: World Map (Wood-mount 130342, Clear-mount 130345) * (I used a different world map stamp) Joy To The World (Wood-mount 131796, Clear-mount 131799)

Paper: Crumb Cake (120953) Cherry Cobbler (119685)

Ink: Staz On Jet Black (101406) Versamark (102283)

Cool Tools: Heat tool (129053) Embossing Buddy (103083)

Finishing Touch: Cherry Cobbler Embossing Powder (122949) Candy Dots Regals (130932) 

Posted on September 1, 2013 .

Feeling Blue?

Paint yourself a different color!

Sketch PPA 169

Sketch PPA 169

This sketch challenge gave me the opportunity to use two stamp sets, purchased at different times at different locations, that I had yet to put to use. I work with clients who suffer from a variety of mental health issues that come to our office for help daily. Many have been diagnosed with depression.  Since all of us have felt depression in our lives of varying degrees, at one time or another, I felt we could all relate. This saying by an 8-year-old little girl brought a smile to my face. If only life’s challenges could be remedied so simply! To see the other cards submitted for this challenge click here.

paint yourself B.jpg
Posted on August 25, 2013 .

Thankful

I am truly grateful

I am truly grateful

After a long Monday at work and fixing dinner for the family I wanted to make a quick and simple Thank you card to share on my blog. I had been awaiting a call from an oncologists office for the results of a recently discovered concern. While awaiting the results I had the opportunity to assess and reassess what is truly important in my life. The call came today and the news was good. I sighed a great big sigh of relief. I am grateful for so many things in my life that the list would be infinite. One thing I am truly grateful for is my health. I work hard to stay in shape, get my rest, eat healthily and exercise. As we all know too well, good health can change in an instant through no fault of our own. I realized that the joy I get from creating, sharing and encouraging others to do the same is a newfound treasure for which I am also truly grateful. 

I cut three pieces of Sweater Weather Designer Paper. Two pieces were cut at 3 ½” x 1 ½” and the third piece cut at 3 ¼” x 3 ½” . I placed them on a 5 ¼” x 4” piece of Early Espresso atop the Very Vanilla base card. I stamped the greeting in Pumpkin Pie, cut it out with an Apothecary Accent framelit. I cut a larger label with Early Espresso card stock for it to be showcased on, popped it up with dimensionals and added a candy dot on either side. I cut a 3 ½” piece of 7/16” Trim and placed an Early Espresso button tied off with Linen Thread.

Product Information + Order Numbers :

    • Stamp Set: Harvest of Thanks (Wood-mount 131736, Clear-mount 131739)
    • Paper: Very Vanilla (101650) Early Espresso (119686) Sweater Weather Designer Paper (132184)
    • Ink: Pumpkin Pie (126945)
    • Cool Tools: Big Shot (113439) Apothecary Accents (127003)
    • Finishing Touch: Neutral Candy Dots (130934) Neutral Designer Buttons (130031) 7/16” Trim (129287) Linen Thread (104199) Dimensionals (104430)


    Posted on August 21, 2013 .

    PPA 168 Oh Boy! It's a BOY!

    I am prepping cards today for the arrival of six guests for a stamping class tomorrow. One of the ladies requested a card for a baby boy and I was playing around with a layout for it. A decision to make an extra one, using the colors I had chosen for the baby card, but to gear it towards the PPA 168 challenge, was made. So this card is using non Stampin’ Up! items as well as Stampin’ Up! to complete my card. To visit the Paper Pals Art challenge 168 click here.

    Oh boy! It's a BOY!

    Posted on August 17, 2013 .

    August Blog Hop

    augustblohopbadge.jpg

    Thank you for joining us for the August Pals Blog Hop. Even though it's only August we want to provide some inspiration for your upcoming holiday projects. This month's blog hop will showcase new products from the 2013 Stampin' Up! Holiday Catalog. We hope you enjoy seeing how we use the new stamps, new punches and other accessories!  

    You should have just left stop number 29 on the Pals Hop... Susan Itell at Simple Stampin. If so, you are in the right spot. If you get off track, the full blog lineup below will help move you from blog to blog so that you can see all the fantastic and amazing creations!

    This was a tough card to narrow down exactly what new goodies from the Holiday catalog to choose!!! I started off with a Christmas card then switched to a Halloween card and created two more Christmas cards before I chose the one posted today.  All the practice will come in handy for my upcoming Stampin’ Up! workshops and classes!

    Christmas Wishes and Lined Envelope

    Christmas Wishes and Lined Envelope

    The reason for my choice of this card in particular, was to showcase a card that would be easy to duplicate yet at the same time highlights a new stamp, new designer paper, new ribbon, new tool and a new embellishment from the Holiday Catalog. You could easily recreate this card with the items you currently have on hand for now, but at the same time envision how to put to use some of the newly available items too. I love the way the 1” Cherry Cobbler ribbon fills the card and how easily the ribbon was to work with.  I purchased the Frosted Finishes Embellishments specifically to be used with Festive Flurry snowflake bundle yet decided to try it on this card anyway. It adds just the right amount of sparkle to offset and compliment the greeting. It is always a pleasant surprise to reach “outside the box” and be happy with the results.

    The final touch is the envelope lined with coordinating designer series paper. It is the icing on the cake, the bow on the present and the cherry on the top of the sundae! I used the Envelope Liners Framelit Dies combined with the Big Shot Magnetic Platform (available to order again on August 26th) for a quick and easy polished finish to the card! I will say for the record that these two items are my all time favorite purchases that I have made with Stampin' Up!, as I have used them for every card since purchasing them! 

    I hope you are happy with the results too!

    Product Information + Order Numbers :

    • Stamp Set: Joy To The World (Wood-mount 131796, Clear-mount 131799)
    • Ink: Gumball Green marker (100080 ) Cherry Cobbler marker (119681)
    • Paper: Gumball Green (126840) Garden Green (102584) Cherry Cobbler (119685) Whisper White (100730) Season of Style DSP (132240)
    • Cool Tools: Stampin' Paper Trimmer (126889) Dotted Scallop Ribbon Border Punch (119275) Big Shot Die Cutting Machine (113439) Big Shot Magnetic Platform (130658) - available to order on Augist 26th 
    • Finishing Touch: Cherry Cobbler 1” Stitched Edge Grosgrain Ribbon (132135) Frosted Finishes Embellishments (132150)  Envelope Liners Framelit Dies (132172)
    • Items that are in bold, itallic lettering are listed in the Stampin' Up! Holiday Catalog

    I am the last stop on the Pals Blog Hop! Thanks for visiting – and I hope to see you next month!  I would love to hear your comments on this card or any of the cards I post!

    Posted on August 13, 2013 .

    PPA 167

    Todays card was made for the PPA 167 challenge. Click here to go to the Paper Pals Art Challenge and view all the cards submitted for this color challenge. Crisp Cantaloupe, Pistachio Pudding and Coastal Cabana were the colors chosen to be used for the challenge.

    The use of butterflies, dimensionals and the stamped saying that appears to be floating makes for a light and airy card. This is a great card for every day use for those that really do make you smile!

    you make me smile...

    you make me smile...


    Posted on August 11, 2013 .

    PPA 166

    Welcome to this weeks PPA 166 Color Challenge.

    Birthday Wishes

    Birthday Wishes

    Between a very busy workweek, out of state overnight company and yesterdays Stamp Camp preparations, I almost did not find the time to make a card! I also spent all of yesterday evening teaching card-making techniques to my newest down line member. I am so glad I was able to sneak a card in today, as the color combo was fun to play with.  The little splashes of embellishment across the card front take this simple card to elegant in a single leap! Click here to go to Paper Pals Art Challenge 166

    Posted on August 4, 2013 .

    PPA-135

     Welcome to the Paper Pals Art Challenge 135

    Lovely Bird

    Lovely Bird

    To view the resident artists cards and the submitted entries click here. The Paper Pals offer a weekly challenge to help inspire and challenge you. I have to admit that I am more than a little intimidated by such amazing cards that are generated by a very talented group of Internet crafters! I will never hone my talents by sitting on the sidelines ~ so I wholeheartedly embrace these opportunities to get busy! I hope that I inspire you to submit a card here or there…that is what my goal is ~ to share ideas and offer encouragement.


    envelope liner and inside of card

    envelope liner and inside of card

    Posted on July 29, 2013 .

    Christmas In July

    What? Christmas twice a year? Once in December and again in July? OK! If you are anything like me than Christmas thoughts cross your mind all year long! As a Stampin' Up! Demonstrator with the new Holiday Catalog fast approaching, it is certainly on the brain lately. I am getting excited about sharing some festive card making techniques in the coming classes that I offer.

    Christmas in July

    Christmas in July

    This card was for the same swap I did the Halloween card also. When I signed up for the swaps there were plenty of current items available to use. Come July 11th when the cards were due there were literally few to none applicable stamps or designer papers available. Stampin' Up! delegated a separate holiday catalog this year that the products were not available in time to use with the swap cards :( 

    The holiday catalog will be available on line and to purchase from August 1st. There are some great holiday cards and tags to get incentive and inspiration displayed in the catalog!!! If you would like a holiday catalog sent to you please email me your request.

    I am posting this card today to show, once again, that when you don't feel that you have the "right" product you will surprise yourself with what you are able to create. I had thoughts of pulling out of the swap because of the lack of product that fit the guidelines. Instead I dug deep and was able to come up with both a Halloween card and Christmas card (under duress!). I will be posting a lot a lot of holiday card ideas with new product over the next few months!!! It is a time of year that generates a desire to give from the heart, and there is nothing quite like a homemade card to fit the bill <3

    To start the Holiday spirit of giving ~ it is time for another raffle. Please leave a comment of what your favorite tradition is for the holidays. Halloween, Thanksgiving, Hanukkah, Christmas or New Years. I will pick a random winner from those who leave a comment to receive a holiday stamp set of their choice (up to $25.00). Winner will be drawn on Saturday, August 3rd

    Posted on July 28, 2013 .

    Tribute to the Stampin' Up Stars...

    This card was made with a few "co-workers" of mine from Stampin' Up! in mind. They are at convention and receiving accolades for the wonderful and creative talents they possess. The best part is they don't keep it to themselves! They share their creativity to inspire and encourage others to express themselves through their papercrafting. Way to Go Pals!

    Rising Stars

    Rising Stars

    Posted on July 20, 2013 .